
2021-EFREI-M1-NICE-FOR-WHAT
Balance has existed for many years. Its style and use have developed over time with the arrival of new researches and technologies. This measuring instrument consists of evaluating masses of two objects in relation to each other.
In the earliest Antiquity, the weights of the scale were hung by a hook on the underside of the scale but with the invention of Robervalt, his idea came up to put the weights directly on the scale and not underneath. Later on, electronics revolutionized its use with the introduction of the Tare, digitalization made it possible to obtain an automatic scale with graduated dials and subsequently with a digital screen.
During the year of preparation for our Master 1 at Efrei Paris, we have a new course called Internet of Things co-teaching by Mr. Ali MODARESI and Aomar OSMANI. Over time, the term IoT, has evolved and now encompasses the whole ecosystem of connected objects. In a conceptual way, it represents connected physical objects with their own digital identity and capable of communicating by producing the massive exchange of data such as data storage and processing.
In a more technical way, IoT is the direct digital identification of a physical object through a communication system.
Nowadays, most objects become connected on the market, especially body scale. In fact, there are all sorts of them, but today in this project we are going to look at connected scales. Its use remains unchanged, the user steps onto the scale and can see his weight displayed. The new functionality allows the user to store his weight in an IoT platform called ThingSpeak, so that he can have a daily monitoring of his weight and avoid gaining weight too quickly.
Scale+ is a connected scale that reads the weight using sensors. This scale is connected through a Wi-Fi network from a smartphone for example. From the ThingSpeak platform, the user will be able to see their weight directly on the dedicated dashboard and will be able to follow the evolution of their weight thanks to a graph according to days, weeks and months.
Slides & Videos
Members
| Name | Contribution |
|---|---|
| Pauline TRUONG | Contribution of Pauline for the IoT project : - purchase materials : wooden panel, scotch tape, adhesive rolls - construction part : set up load cells on the scale, solder wires together - assembling part of the component are made together - coding part : implementation of the OLED display - video : edit the video - PPT presentation, Report and Github are done together |
| Billy CHHUON | Contribution of Billy for IoT project : - purchase materials : 4x load cells 50kg + HX711 - construction part : drill holes in the scale - assembling part of the component are made together - realization of the Fritzing schematic - coding part : implementation of the "many users" functionality - video : take shots for the video and add sound after editing the video - PPT presentation, Report and Github are done together |
State of the Art
Business Aspect
In society, the weight of a person has always been a complex subject. Social networks and media show us every day, photos of models with a perfect appearance without knowing that most of them are retouched. The objective would be for everyone to look like them, have a healthy diet and do a lot of sport. Yet very few people manage to keep this balance. In reality, a person’s weight is not just the single number on the scale, in fact, it is thanks to a lot of indicators that help to determine weight.
The question that can be asked is to see if a connected scale is really better than a simple scale, but above all, what more will it bring to your daily life ?
According to the website “Statistica”, this graph shows the proportion of people who are interested in using a connected scale classified by ages. We can notice, obviously, that the youngest are the most interested in particular those from 12 to 25 years old. This graph has been realized in 2015 that’s why this statistic can evolve with the rise of connected objects.
Graph of percentage of people interested using a connected scale

Graph of percentage of people interested using a connected scale depending on financial situation

However, owning this kind of connected object is quite expensive and not everybody can afford it. Prices evolve according to the functionalities offered but remain unaffordable for some people.
The second graph presented below shows the low-income class and upper middle class are the most interested by having a connected scale. They represent 25% which is quite high but most impressively, this graph demonstrates that price doesn’t matter. In fact, the four classes have almost the same percentage.
On the market there are several varieties of connected scales which are suitable for all types of person.
- FitTrack
The most popular one is FitTrack. This connected scale can analyze all parts of the body with 17 specific indicators such as: body hydration rate, percentage of fat mass, muscle or bone mass and many others. It is particularly well known because a lot of influencers promote it on social networks and offer promotional codes for the purchase of this scale, that is worth 84,90€

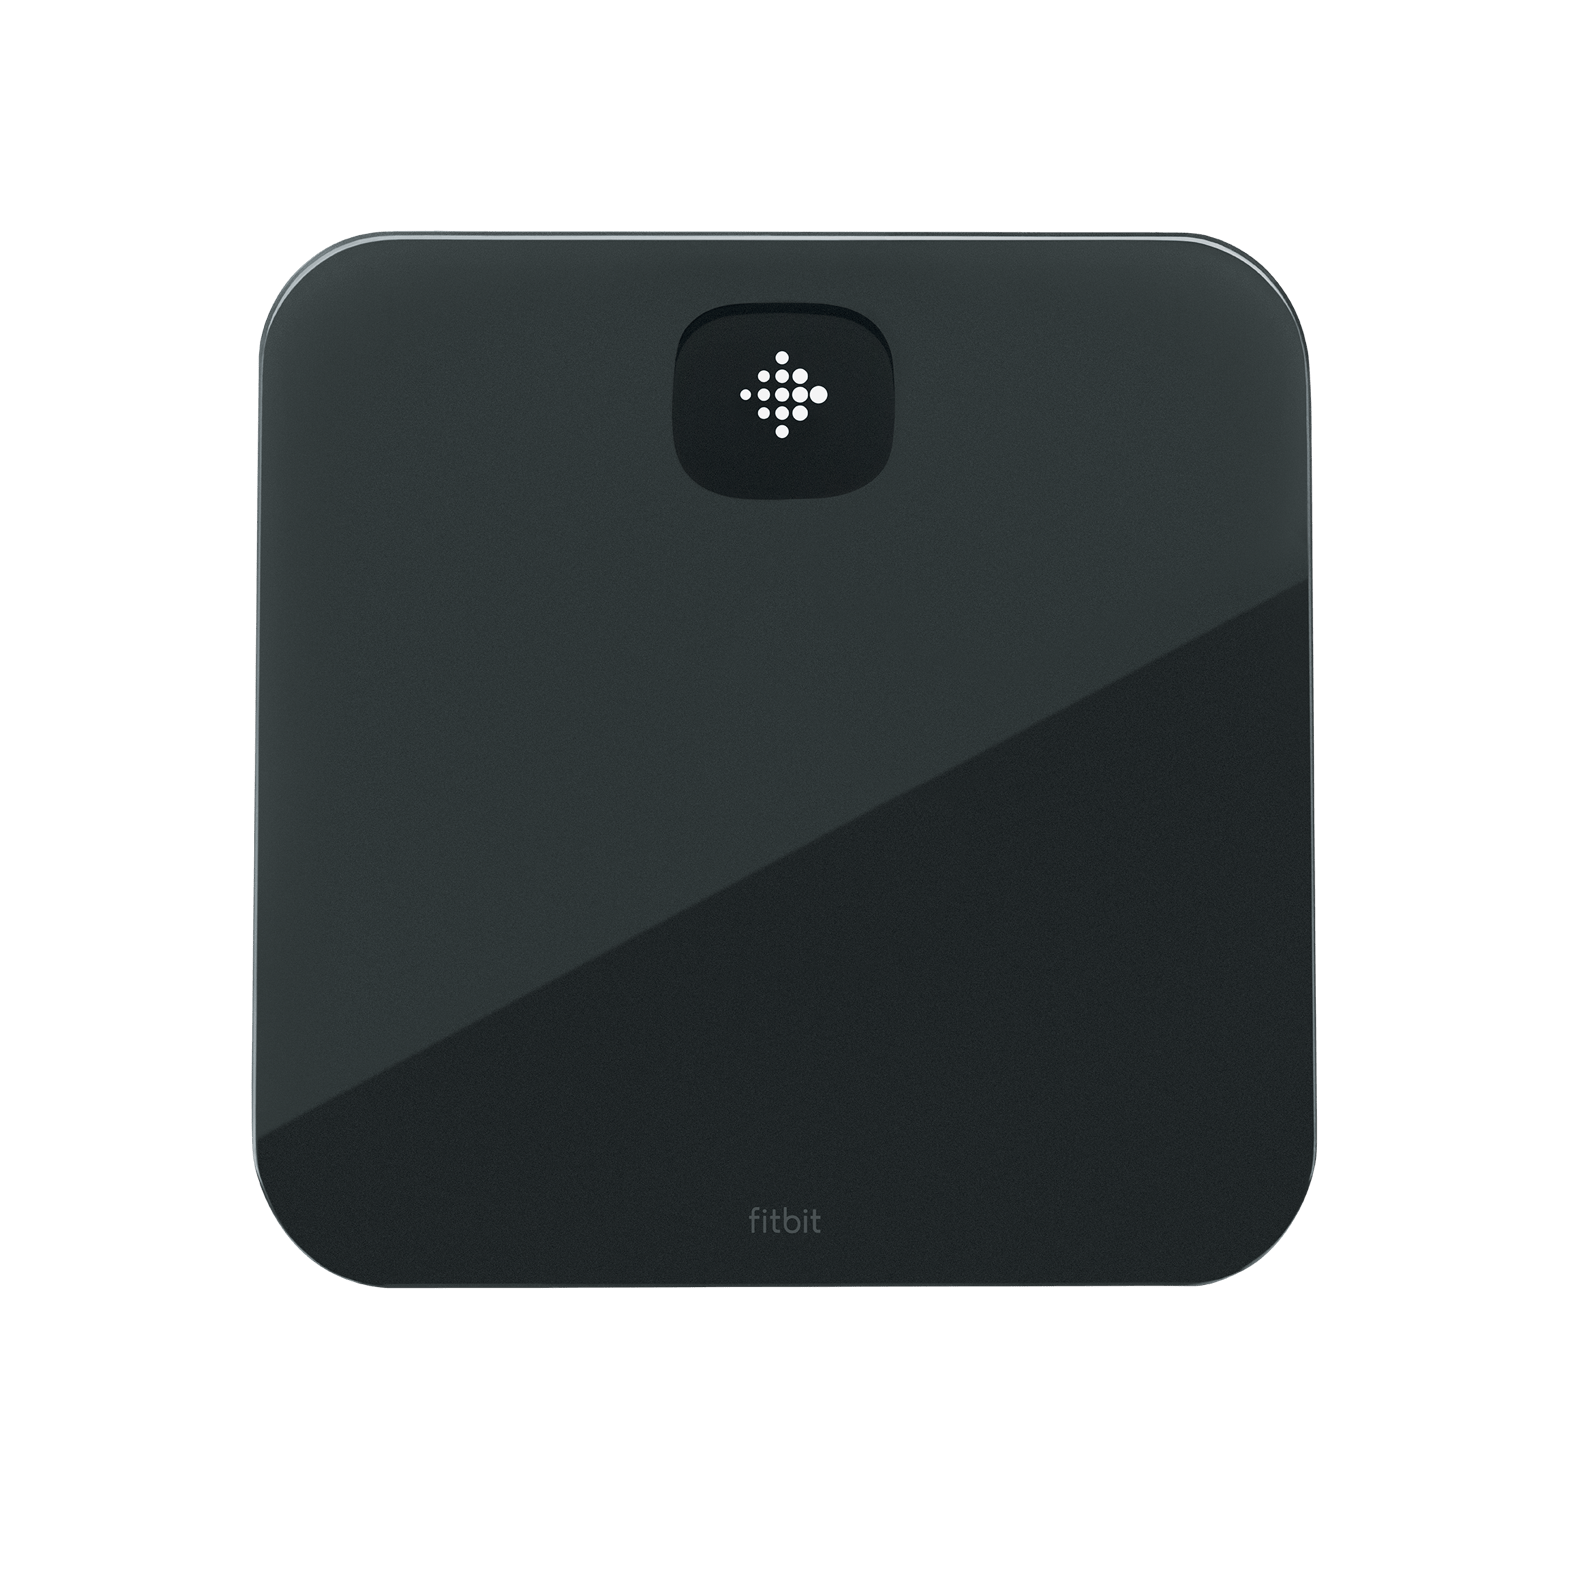
- FitBit Aria Air
FitBit Aria air is a smart scale that syncs with the FitBit app in which you can view BMI, as well as graphes to see your weight evolution over time. It is easy to use but costs 59,00€.
- QardioBase 2
QardioBase 2 is a smart scale that syncs with the Qardio app which gives you information about your weight, BMI, but also full composition of your body (body fat percentage, muscle, water, and bone mass). With a beautiful design, it has a pregnancy mode as well. This connected scale is specific to professional sportsmen, who need a precise and constant monitoring of their body. This one is more expensive and cost 149,99€.

Technical Aspect
Balance impédancemètre : comment ça marche ?
Every connected scale our own does the same main function, read the weight of any user. The difference with the ones listed above and ours, is that they have more indicators such as hydratation rate, BMI, percentage of fat mass and many more as you can see on FitTrack interface : (We are able to see this interface because Billy owns a FitTrack scale)
FitTrack interface for the user Billy

Our project could also propose these indicators for our users, but it would require the technology called “Impedance meter” and thus increase the production cost of our scale.
In order to know the mass rate in a person’s body, an impedance meter balance requires the use of a sensor component that will send a small electric current of low intensity into the body – without the person noticing – and in a few seconds, it will display the data it has obtained in the interface shown above.
We didn’t have this functionality part in our Scale+ project but it could be a future improvement for our project.
Therefore, with all technologies mentioned, a connected body scale would still be an expensive scale and thus unaffordable for low-income individuals.
Project Description
Problem Definition
This project could be very useful to keep track of your own weight evolution. Whether you are an athlete, or a food lover, you will see the increase or the loss of weight in a small or larger interval of time.
Challenges & Motivation
Our aim was also to show that a connected scale that can be found on the market is relatively expensive and that we could do the same thing on a smaller budget.
Finally, we spent a lot of time on this project but we are proud to have taken up the challenge we set ourselves.
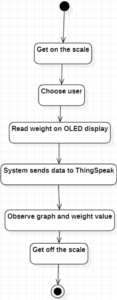
Real and Complete Usecases
In order to see how the scale project works, we will see below an UML activity diagram of the situation.
Technical Description
Scale+ project involves a few components as we showed above. First, we will see their functionality and how they are working together. Afterwards, we will discuss steps that help us to implement this project and issues we encountered. All the parts will be illustrated with schematics and photos taken during the scale construction.
Scale+ connected part

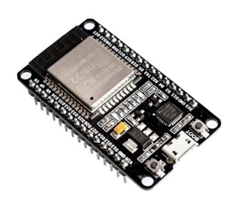
- ESP32
The micro controller ESP32 is the first important component. In the lab four of IoT, we had the opportunity to work with this component which has an integrated Wi-Fi and dual-mode Bluetooth. This board is the most adapted for this project because we want to communicate by sending data’s and provide an IoT dashboard for our scale.
ESP32 component
- Load Cell 50kg
For this project, we will need 4 load cells of 50kg each and set them on the four outer corners of the scale. A load cell is a metal force transducer that have strain gauges glue to them. A strain gauge is a potentiometer that can determine some pressure variance which is converted into the weight whether it is grams, kilograms or ounces depending on our unit of measurement.
Each of load cells have 3 wires: red, black and white to provide power, ground and sensor reading. The goal of the load cell is to measure weighting with the pressure of the weight placed on the scale.

In the load cell’s picture above, we can make a distinction between the inner square and the outer square. This part is an important one when building the scale because we need to set the load cell on a support so that the inner square can flex up and down inward. Otherwise, the scale won’t read the weight properly. So, it is thanks to the pressure on this piece that the scale works.
- HX711
HX711 is an amplifier module for Wheatstone bridge force transducers based on an analogue-to-digital converter. It allows the reading of changes in resistance of the force transducers, which will give you accurate measurements after calibration. Its goal is to make the connection between the microcontroller and the scale. Moreover, we can use analog input of our microcontroller to read the weight directly from the load cell but the voltage inside the cell is very small and the sensitivity of the analog to digital converter in the ESP32 is not enough to do this, that’s why HX711 amplifier is important for the reading.
HX711 Component
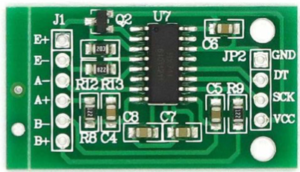
Now, let’s have a look at the component. We can see two parts the left one and the right one.
The left part of the HX711 amplifier is used to make the connection with the load cells and the scale. E- and E+ represents the excitations pins and A+ and A- are the amplifier pins. For this project, we won’t be able to use B+ or B- (shield) because theses pins act as an optional input which is not connected to the strain gauge but it is used for grounding and protection against external electromagnetic interference (EEI).
On the right side of the HX711 amplifier, those pins are used to connect with the micro-controller ESP32. We have ground and VCC supplied by the ESP32. On the ESP32 VCC is 3,3V and we will use any digital pin for DOUT and Clock.
Step 1 : Board construction
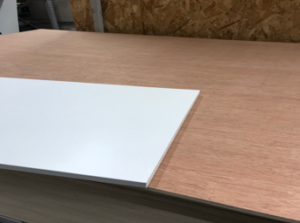
The first thing to realize is to build the scale. We went to Castorama and bought a wooden panel size 33×33 thick enough to support the weight of a human on it. We also decided to buy white adhesive rolls to recover the contours of wood that has been cut off.
Modelisation of our plank with Fusion360
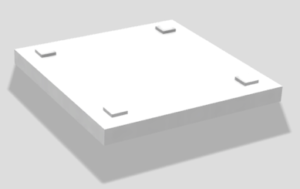
Image of the wooden plank we used
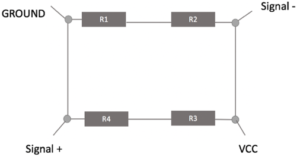
The next step of this first part is to set load cells sensors on the scale. As we saw on the component description, load cells use the Wheatstone bridge principle and our four load cells need to be set up in the following a specific order. A Wheatstone bridge is a bridge circuit used to measure electrical resistance depending on the strain pressure.
As we can see on the following schematic: we have four resistors for our four sensors.
The sensor E- is going to represent the excitation ground, the sensor E+ represents the VCC, the sensor A+ represents the sensor positive and A- represents the sensor negative.
Also, we need to connect the black wires together, from lower to upper and the white wires from the left to the right and we will use the red one to connect to the HX711.
-
Wheatstone bridge
As we said earlier in the component description part, the inner square of the load cell needs some space between the scale and the ground to flex. It is for this reason we decided to drill a hole in the wooden plank.
Here is the result of our scale :
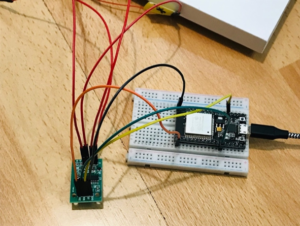
Step 2 : Connecting wires together
For this part we will be interested in how the other side of the HX711 is connected to the ESP32. As we can see here, HX711 has a Ground, DOUT, Clock and VCC.
We will connect :
- HX711 Ground to ESP32 Ground
- HX711 VCC with ESP32 VCC which is 3,3V here.
DOUT pin 2 and Clock pin 12 we choose a random pin to connect them to ESP32.
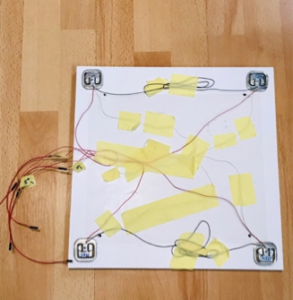
Board image : Connection between the load cells, HX711 and ESP32
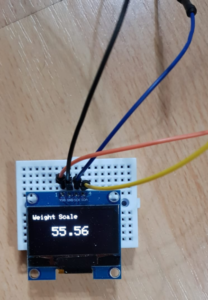
Step 3 : Display weight on OLED screen
Now that the main steps are realized, it is the moment to see if everything works together. To do so, we want to display people’s weight on an OLED screen. We use the Lab 4 of our IoT courses to implement this part and followed the schematic.
Board image OLED display weight
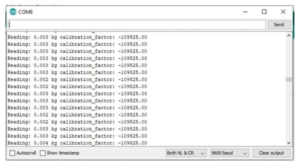
Step 4 : Scale calibration
After connecting all the wires together with the OLED, we will test our scale and see if it reads any weight. Before any manipulation, we first need to calibrate the scale. Calibrate the scale means that we need to set up the scale to 0kg without any weight on the scale.
To calibrate our scale, we will use a program we found.
- Compile the code and look at the value on the serial
- See a lot value close to zero but not the exact value
- Adjust the value by increasing or decreasing the reading value to obtain 0.00kg
Serial monitor for scale calibration
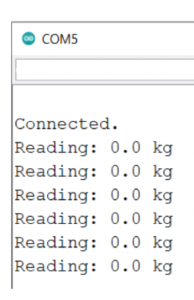
When it is done, we will record the calibration factor and put it on the main code.
Now we have correctly calibrate our scale.
Serial monitor with good calibration
Step 5 : Connection with Thingspeak
The last step of this project is to send the data here is the weight of a person to a IoT platform. We decided to choose the Thingspeak dashboard to realize the record.
In the platform, we implement two user profiles for the two members of our group so we can check our own weight on a graph and another test profile for the demonstration in class.
To manage this functionality, we set up a number to send in the serial monitor for each user. For example if the user Pauline is getting on the scale, we have to wait two seconds until the weight is stabilized and then we will send the number 2 in the serial monitor as followed :
Serial monitor for user 2
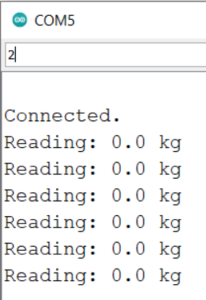
After the input of the user number, the serial monitor will display the correct weight and the user can check on Thingspeak his graph and can analysis his body’s evolution.
Scale+ IoT dashboard

Hardware


Software
Arduino Code
/******************************************************************
For the scale calibration part, we used the code provided by Mr. Alam on the website how2electronic.com for the
project IoT Weighing Scale with HX711 Load Cell & ESP8266.
https://how2electronics.com/iot-weighing-scale-hx711-load-cell-esp8266/
We used HX711 library

*********************************************************************/
#include "HX711.h"  //You must have this library in your Arduino library folder

#define DOUT  D5
#define CLK  D6

HX711 scale(DOUT, CLK);

//Change this calibration factor as per your load cell once it is found you many need to vary it in thousands
float calibration_factor = -109525; //-106600 worked for my 40Kg max scale setup

//=============================================================================================
//                         SETUP
//=============================================================================================
void setup() {
  Serial.begin(9600);
  Serial.println("HX711 Calibration");
  Serial.println("Remove all weight from scale");
  Serial.println("After readings begin, place known weight on scale");
  Serial.println("Press a,s,d,f to increase calibration factor by 10,100,1000,10000 respectively");
  Serial.println("Press z,x,c,v to decrease calibration factor by 10,100,1000,10000 respectively");
  Serial.println("Press t for tare");
  scale.set_scale();
  scale.tare(); //Reset the scale to 0

  long zero_factor = scale.read_average(); //Get a baseline reading
  Serial.print("Zero factor: "); //This can be used to remove the need to tare the scale. Useful in permanent scale projects.
  Serial.println(zero_factor);
}

//=============================================================================================
//                         LOOP
//=============================================================================================
void loop() {

  scale.set_scale(calibration_factor); //Adjust to this calibration factor

  Serial.print("Reading: ");
  Serial.print(scale.get_units(), 3);
  Serial.print(" kg"); //Change this to kg and re-adjust the calibration factor if you follow SI units like a sane person
  Serial.print(" calibration_factor: ");
  Serial.print(calibration_factor);
  Serial.println();

  if(Serial.available())
  {
    char temp = Serial.read();
    if(temp == '+' || temp == 'a')
      calibration_factor += 10;
    else if(temp == '-' || temp == 'z')
      calibration_factor -= 10;
    else if(temp == 's')
      calibration_factor += 100;
    else if(temp == 'x')
      calibration_factor -= 100;
    else if(temp == 'd')
      calibration_factor += 1000;
    else if(temp == 'c')
      calibration_factor -= 1000;
    else if(temp == 'f')
      calibration_factor += 10000;
    else if(temp == 'v')
      calibration_factor -= 10000;
    else if(temp == 't')
      scale.tare();  //Reset the scale to zero
  }
}
/******************************************************************
This part of the connection with wifi was inspired by our Lab4 in the IoT course
https://github.com/efrei-paris-sud/2020-E-Nice-For-What/tree/main/lab/4
******************************************************************/
if(WiFi.status() != WL_CONNECTED){
Serial.print("Attempting to connect to SSID: Billy");
while(WiFi.status() != WL_CONNECTED){
WiFi.begin(ssid, pass); // initialize the connection
Serial.print(".");
delay(2000);
}
Serial.println("\nConnected.");
}/******************************************************************
This is the code for the OLED display
******************************************************************/
display.setCursor(0, 5);
display.setTextColor(WHITE);
display.setTextSize(1);
display.println("Weight Scale");
display.setCursor(30, 25);
display.setTextColor(WHITE);
display.setTextSize(2);
display.println(weight);
display.display();
delay(1500);
display.clearDisplay();
display.display();
delay(1500);/******************************************************************
This is the code for the many users profile with ThingSpeak platform
******************************************************************/
if(Serial.available())
{
char temp = Serial.read();
if(temp == '1')
{
int x = ThingSpeak.writeField(myChannelNumber, 1, weight, myWriteAPIKey);
delay(2000);
}
else if (temp == '2')
{
int x = ThingSpeak.writeField(myChannelNumber, 2, weight, myWriteAPIKey);
delay(2000);
}
else if (temp == '3')
{
int x = ThingSpeak.writeField(myChannelNumber, 3, weight, myWriteAPIKey);
delay(2000);
}
}
External Services
Visualization of the ThingSpeak IoT dashboard for Scale+
According to ThingSpeak website, “ThingSpeak is an IoT analytics platform service that allows you to aggregate, visualize and analyze live data streams in the cloud. ThingSpeak provides instant visualizations of data posted by your devices to ThingSpeak. The platform is often used for prototyping and proof of concept IoT systems that require analytics. “