iot-2020-M1-Thereminimin
Our project is about making a theremin-like iinstrument, A theremin is an electrical music instrument that crosses all frequencies (like a violin). It uses a proximity sensor as it is controlled by distance.
The objective was not to replicate fidely a Theremin but to offer it's user a similar enough experience to help profanes practise and know whether or not they would like to invest in a professional theremin
Slides & Videos
Members
| Name | Contribution |
|---|---|
| Chauvet Timothé | Arduino coding and application coding on MIT App Inventor and Kodular, video making |
| Mathieu Camille | Arduino coding, realization and testing of the hardware. |
State of the Art
Business Aspect
Professional theremins are very expensive , starting at 100$
honest question. pleased no biased answers
Theremin are considered the most difficult instrument to play in the world and , as said by theremin user, are indeed very sensitive and peculiar to use. They are unlike ant other instruments and thus it is complicated to get an idea of what playing a theremin feels like without having one.
Technical Aspect
A theremine is an instrument with two protruding antennas -a straight vertical one controlling pitch, and a looped horizontal one controlling volume.
There are two tuned oscillators, a fixed one that generates waves at a static frequency, and a variable one producing on a range and connected to the vertical antenna Through a process called heterodyning, signals from the fixed and variable oscillators were mixed together. The frequency of one oscillator was subtracted from the other. The difference was amplified and, finally, output as an audible musical tone. Obviously, theremini-min doesn’t work this way and only mimics the use of an electronic theremin.
The usual range of playability on a theremin is between octaves.
The pitch circuit uses a fixed-frequency oscillator operating at 260 kHz and a variable-frequency oscillator having a range of 257-260 kHz.
Thus the theremin can produce sound from 65 Hz to about 3 kHz.
Project Description
Problem Definition
Challenges & Motivation
Especially regarding the app as Timothe was the one in our group having prior experience making android applications yet both his phone and computer didn't recognize the ESP32.
Our motivation was to help beginners 'get a feel' of a theremin-like instrument since it's a very attractive yet very delicate instrument to play. With our project people interested in the big investment that is a theremin (both monetary and timely) can try and train themself at a much lower price.
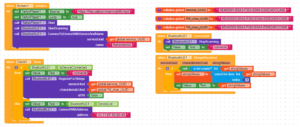
Real and Complete Usecases
The blocks code used for the application is as follows :
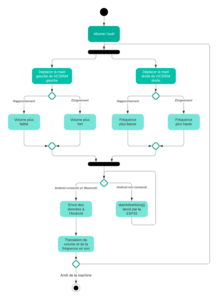
Regarding the activity loop of our Thereminimin, here it is
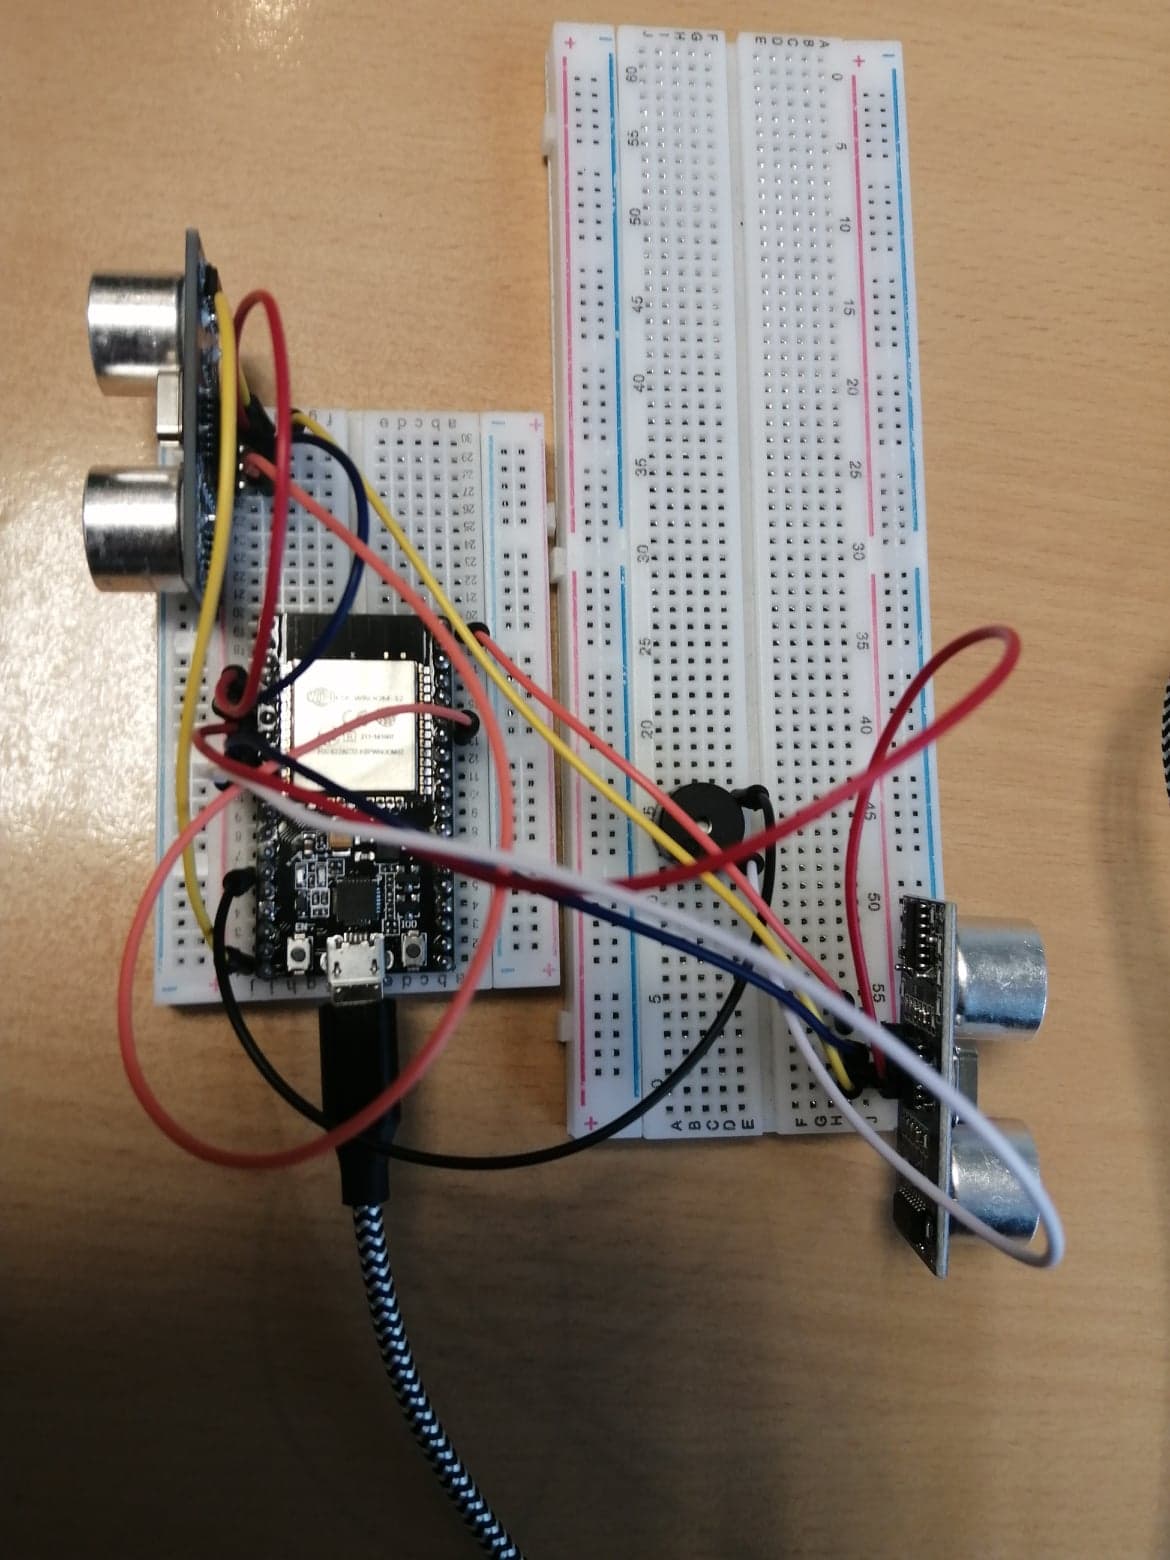
Technical Description
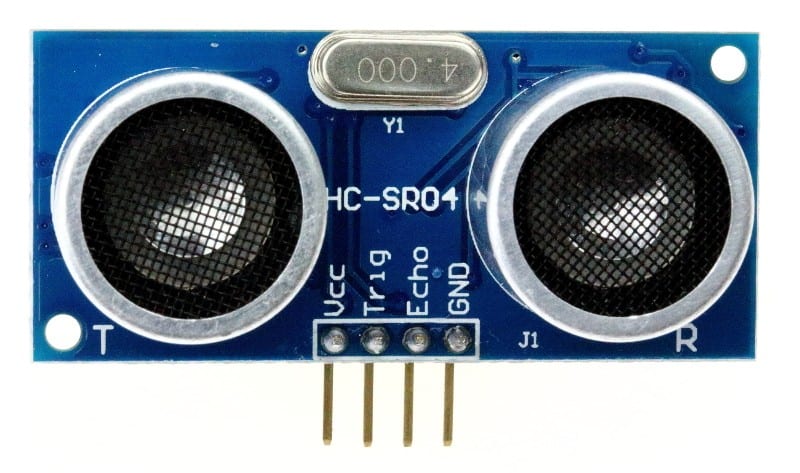
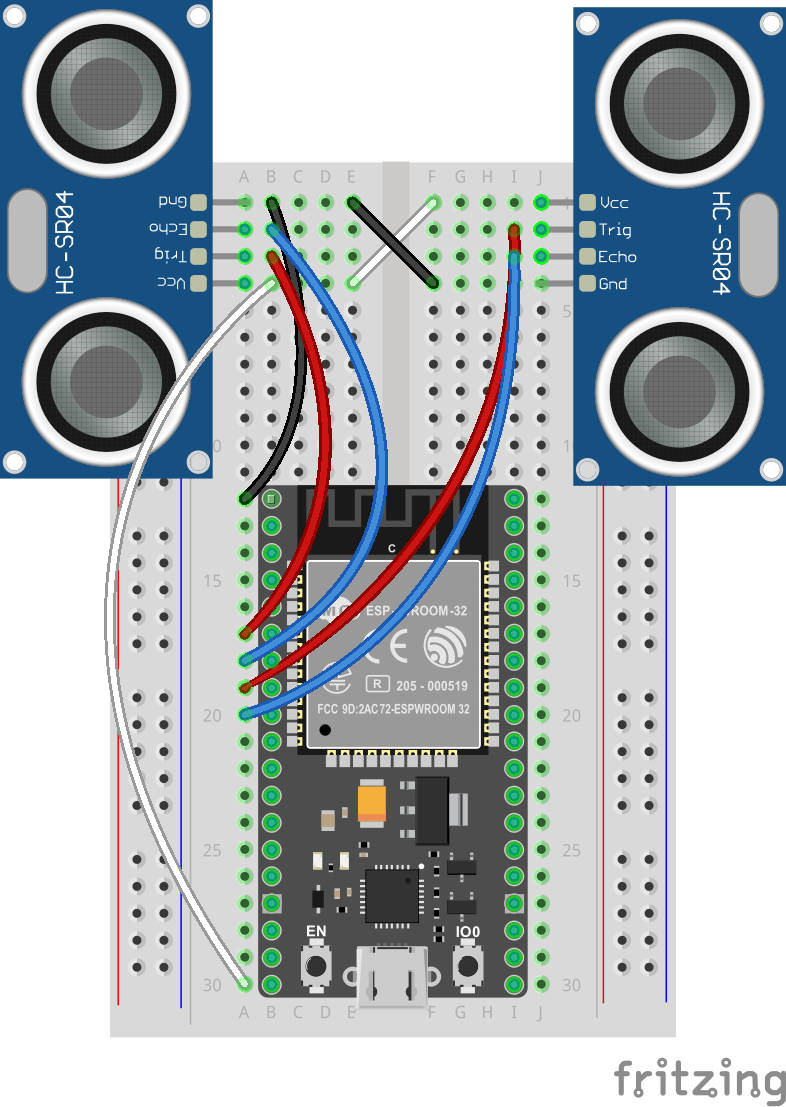
Two proximity sensors collect the distance between the hand and the object, using ultrasound reverberation with the object (here our hand).
Those distances in centimeters are then translated into integer values.
The left hand collects the volume whereas the right hand collects the frequency.
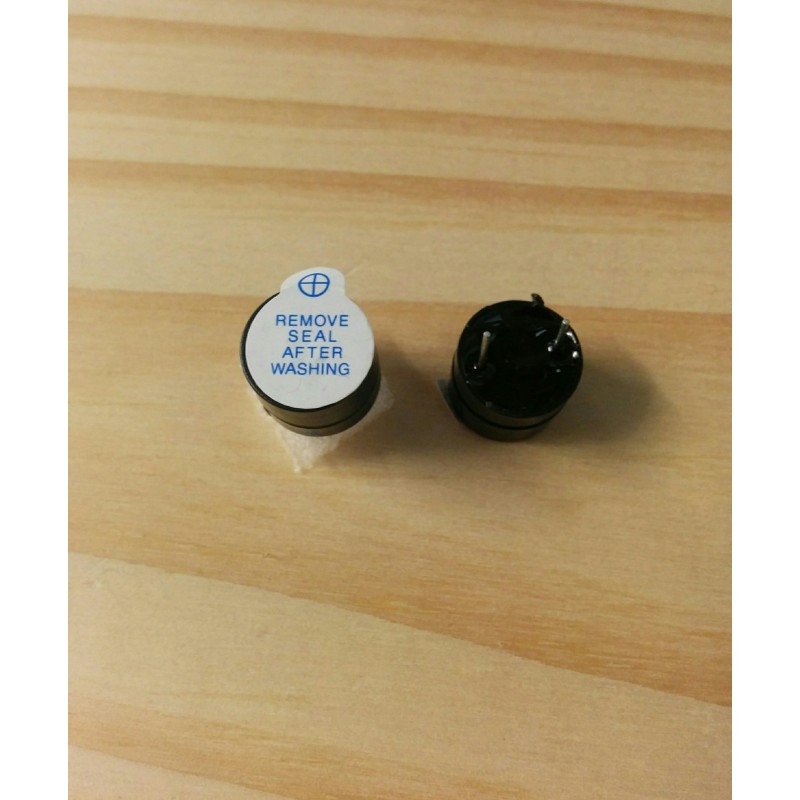
For the frequency part, it trunkates the distance between 5cm and 50cm, arbitrary values we chose. This distance is then converted to an integer value, which we add 300 (because below 300Hz, the buzzer isn’t audible) and which we multiply by 20 (so that we can go from 300Hz to 1200Hz, which is quite a reasonable range for a passive buzzer).
Both values are sent to the Android phone if it is connected by Bluetooth. However, even though we can connect the ESP32 and the phone, we cannot transmit data as it appears incompatible with the Android standards from the MIT App Inventor engine.
Hardware
Software
Arduino Code
#include#include #include #include #include //#define SERVICE_UUID "6E400001-B5A3-F393-E0A9-E50E24DCCA9E" //UART service UUID //#define CHARACTERISTIC_UUID_RX "6E400002-B5A3-F393-E0A9-E50E24DCCA9E" //Receiver //#define CHARACTERISTIC_UUID_TX "6E400003-B5A3-F393-E0A9-E50E24DCCA9E" //Sender #define SERVICE_UUID "4fafc201-1fb5-459e-8fcc-c5c9c331914b" #define CHARACTERISTIC_UUID "beb5483e-36e1-4688-b7f5-ea07361b26a8" BLECharacteristic *pCharacteristic; bool deviceConnected = false; float currVol = 0; int volume = 0; float currFreq = 0; int frequency = 0; const int readPin = 32; // Use GPIO number. See ESP32 board pinouts //debug int value = 0; bool oldDeviceConnected = false; BLEServer* pServer = NULL; //The two ultrasound sensors UltraSonicDistanceSensor distanceSensorVolume(34, 35); //(Trig, Echo) UltraSonicDistanceSensor distanceSensorFrequency(32, 33); //(Trig, Echo) class MyServerCallbacks: public BLEServerCallbacks { void onConnect(BLEServer* pServer) { deviceConnected = true; }; void onDisconnect(BLEServer* pServer) { deviceConnected = false; } }; int convertFreq(float currFreq) { if(0 <= currFreq < 5) { return 0; } else if(5 <= currFreq < 10) { return 1; } else if(10 <= currFreq < 15) { return 2; } else if(15 <= currFreq < 20) { return 3; } else if(20 <= currFreq < 25) { return 4; } else if(25 <= currFreq < 30) { return 5; } else if(30 <= currFreq < 35) { return 6; } else { return 7; } } void setup() { Serial.begin(115200); //BLE Device BLEDevice::init("ESP32 UART testing"); //BLE Server pServer = BLEDevice::createServer(); pServer->setCallbacks(new MyServerCallbacks()); //BLE Service BLEService *pService = pServer->createService(SERVICE_UUID); //BLE Characteristic pCharacteristic = pService->createCharacteristic( CHARACTERISTIC_UUID, BLECharacteristic::PROPERTY_READ | BLECharacteristic::PROPERTY_WRITE | BLECharacteristic::PROPERTY_NOTIFY | BLECharacteristic::PROPERTY_INDICATE ); pCharacteristic->addDescriptor(new BLE2902()); // Start the service pService->start(); // Start advertising BLEAdvertising *pAdvertising = BLEDevice::getAdvertising(); pAdvertising->addServiceUUID(SERVICE_UUID); pAdvertising->setScanResponse(false); pAdvertising->setMinPreferred(0x0); // set value to 0x00 to not advertise this parameter BLEDevice::startAdvertising(); Serial.println("Waiting a client connection to notify..."); //Do it with the buzzer ledcSetup(0, 2000, 8); //Channel, Freq, Resolution ledcAttachPin(25, 0); //Pin, Channel } void loop() { /* // notify changed value if (deviceConnected) { pCharacteristic->setValue(value); Serial.println(value); pCharacteristic->notify(); value++; delay(1000); // bluetooth stack will go into congestion, if too many packets are sent, in 6 hours test i was able to go as low as 3ms } // disconnecting if (!deviceConnected && oldDeviceConnected) { delay(500); // give the bluetooth stack the chance to get things ready pServer->startAdvertising(); // restart advertising Serial.println("start advertising"); oldDeviceConnected = deviceConnected; } // connecting if (deviceConnected && !oldDeviceConnected) { // do stuff here on connecting oldDeviceConnected = deviceConnected; }*/ currVol = distanceSensorVolume.measureDistanceCm() - 5; currFreq = distanceSensorFrequency.measureDistanceCm() - 5; //Convert the volume value to 0-100 volume = (int) (currVol * 2.5); //Trunkate the values (volume < 0) ? 0 : volume; (currFreq < 0) ? 0 : currFreq; (volume > 100) ? 100 : volume; (currFreq > 40) ? 40 : currFreq; frequency = (int) currFreq*100; Serial.println(frequency); //For the buzzer ledcWriteTone(0, currFreq); if(deviceConnected) { char txVolume[3]; itoa(volume, txVolume, 10); pCharacteristic->setValue("cc"); pCharacteristic->notify(); Serial.println("Value sent : cc"); } }
#includefloat currVol = 0; int volume = 0; float currFreq = 0; int frequency = 0; //The two ultrasound sensors UltraSonicDistanceSensor distanceSensorVolume(34, 35); //(Trig, Echo) UltraSonicDistanceSensor distanceSensorFrequency(32, 33); //(Trig, Echo) void setup() { Serial.begin(115200); ledcSetup(0, 2000, 8); //Channel, Freq, Resolution ledcAttachPin(25, 0); //Pin, Channel } void loop() { //currVol = distanceSensorVolume.measureDistanceCm(); currFreq = distanceSensorFrequency.measureDistanceCm(); //currVol -= 5; //Remove the first 5 centimeters currFreq -= 5; //volume = (int) currVol; frequency = (int) currFreq; //Trunkate the values from 5 to 50cm //volume = (volume < 1) ? 1 : volume; //volume = (volume > 45) ? 45 : volume; frequency = (frequency < 1) ? 1 : frequency; frequency = (frequency > 45) ? 45 : frequency; //volume *= 5; //To access all audible notes frequency *= 20; //The minimal value frequency += 300; Serial.print("f="); Serial.println(frequency); //Serial.print(" | v="); //Serial.println(volume); //For the buzzer //ledcWrite(0, volume); ledcWriteTone(0, frequency); }
